Battery switch on travel trailer function is crucial for managing your RV’s power. Understanding how your battery switch works is key to preventing dead batteries and ensuring a smooth camping experience. This guide breaks down the different types of switches, their operation, troubleshooting common problems, and essential maintenance tips to keep your travel trailer running smoothly.
We’ll cover everything from connecting and disconnecting batteries safely to integrating your battery switch with your charging system (solar, alternator, etc.). Learn about best practices for maintaining battery connections, preventing corrosion, and extending the life of your RV batteries. We’ll even show you how to troubleshoot common issues and replace a faulty switch if needed.
Understanding Battery Switch Functionality in Travel Trailers
A battery switch is a crucial component in a travel trailer’s electrical system, allowing you to control the flow of power from your trailer batteries to various appliances and systems. Understanding how it works is essential for maintaining your trailer’s power and preventing potential issues.
The primary purpose of a battery switch is to isolate your trailer batteries from the rest of the electrical system when not in use. This prevents battery drain, especially important during extended periods of storage. It also lets you choose which battery bank (or both) to use, depending on your needs.
Battery Switch Types
Travel trailers utilize different types of battery switches, each offering specific advantages and disadvantages. The choice often depends on the number of batteries and the complexity of the electrical system.
Common types include single battery switches, dual battery switches, and rotary switches. Single switches are the simplest, controlling only one battery bank. Dual switches allow you to select between two battery banks or to connect both. Rotary switches typically offer more options, including a “both,” “off,” and individual battery selections.
Operating a Battery Switch, Battery switch on travel trailer function
Proper operation of your battery switch is vital to prevent electrical problems and ensure your trailer’s power is correctly managed.
- Identify your switch type: Familiarize yourself with your specific switch’s markings and positions. Most switches clearly indicate the “on,” “off,” and any additional positions like “battery 1,” “battery 2,” or “both.”
- Turn off the switch before disconnecting from shore power: Before unplugging from shore power, always ensure the battery switch is in the “off” position. This prevents accidental discharge and protects your batteries.
- Select the desired battery bank (if applicable): If you have a dual or rotary switch, choose the battery bank you want to use. For example, you might use one battery bank for house appliances and the other for starting your tow vehicle.
- Turn the switch to the “on” position: Once you’ve selected your battery bank, turn the switch to the “on” position to power your trailer’s systems.
- Monitor battery levels: Regularly check your battery levels to ensure they are adequately charged and prevent deep discharge.
Comparison of Battery Switch Types
Here’s a table comparing the features and benefits of different battery switch types:
| Switch Type | Number of Batteries Controlled | Features | Benefits |
|---|---|---|---|
| Single Battery Switch | One | Simple on/off control | Cost-effective, easy to use |
| Dual Battery Switch | Two | Separate control for each battery bank, often with a “both” option | Allows independent management of two battery banks, ideal for larger trailers |
| Rotary Battery Switch | One or Two (depending on the model) | Multiple positions, including “off,” “battery 1,” “battery 2,” and “both”; often includes an additional “start” position for the tow vehicle. | Offers versatile control and protection options. Can incorporate additional safety features. |
Connecting and Disconnecting Batteries
Connecting and disconnecting your travel trailer’s house batteries requires careful attention to safety and proper procedure. Improper handling can lead to sparks, corrosion, and even injury. This section details the steps involved, best practices for maintenance, and crucial safety precautions.Properly connecting and disconnecting your batteries ensures reliable power for your appliances and prevents damage to your charging system. Always follow these steps to avoid potential problems.
Connecting House Batteries to the Charging System
Before connecting, ensure the battery switch is in the “OFF” position. This prevents accidental short circuits. Locate your battery terminals – usually clearly marked positive (+) and negative (-). Connect the positive cable to the positive terminal and the negative cable to the negative terminal. Use appropriately sized cables and connectors to avoid overheating.
Tighten the connections securely, but avoid over-tightening which can damage the terminals. Once connected, turn the battery switch to the “ON” position.
Disconnecting House Batteries from the Charging System
The disconnection process is the reverse of connection. First, turn the battery switch to the “OFF” position. Then, carefully disconnect the negative cable from the negative terminal, followed by the positive cable from the positive terminal. Always disconnect the negative cable first to avoid accidental short circuits. Store the disconnected cables neatly to prevent damage or accidental contact.
Okay, so you’re wondering about that battery switch in your travel trailer? It’s super important! Check out this guide on the battery switch on travel trailer function to understand how it works. Knowing how to use it properly will keep your batteries charged and prevent draining. This is especially helpful if you’re boondocking. Another great resource explaining the battery switch on travel trailer function offers a different perspective and might clarify any lingering questions.
Basically, understanding this switch is key to a smooth and power-filled RV adventure!
Maintaining Battery Connections to Prevent Corrosion
Battery terminal corrosion is a common problem that can reduce battery life and performance. Regular cleaning and preventative measures are essential. Use a wire brush or terminal cleaner to remove corrosion from the terminals and cable ends. Apply a corrosion inhibitor or dielectric grease to the terminals after cleaning to prevent future corrosion. Regularly inspect your connections for any signs of corrosion or looseness.
Safety Precautions When Working with RV Batteries
RV batteries contain corrosive acid and can produce explosive hydrogen gas. Always wear appropriate safety glasses or a face shield to protect your eyes from splashes or fumes. Ensure adequate ventilation when working with batteries, as hydrogen gas is flammable and explosive. Never smoke or use open flames near batteries. If you spill battery acid, neutralize it immediately with baking soda and water, and then clean the area thoroughly.
Wear gloves to protect your hands from corrosive battery acid. If you’re unsure about any aspect of battery maintenance, consult a qualified RV technician.
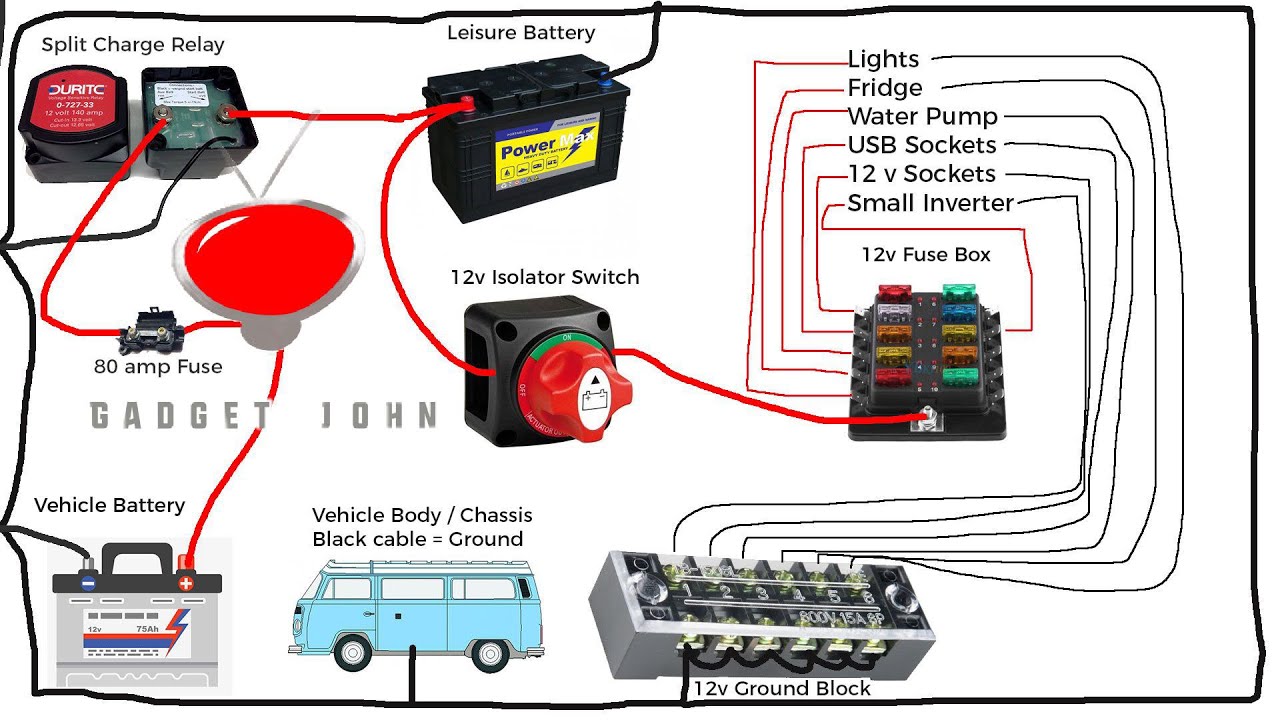
Dual-Battery System Wiring Configuration
Imagine a diagram showing two 12-volt batteries labeled “Battery 1” and “Battery 2”. Each battery has a positive (+) and negative (-) terminal. A thick red wire connects the positive terminal of Battery 1 to the positive terminal of Battery 2. This is the main positive bus bar. A thick black wire connects the negative terminal of Battery 1 to the negative terminal of Battery 2.
This is the main negative bus bar. From the positive bus bar, a smaller red wire runs to the positive terminal of the charging system (converter/charger). From the negative bus bar, a smaller black wire runs to the negative terminal of the charging system. Finally, additional smaller red and black wires branch off from the positive and negative bus bars respectively, leading to the various electrical components in the RV, such as lights, appliances, and water pump.
All connections should be secured with appropriate connectors and tightened appropriately. The diagram clearly shows the parallel configuration, ensuring both batteries are charged simultaneously and provide combined power.
Troubleshooting Common Battery Switch Issues
Your travel trailer’s battery switch is a critical component, ensuring you have power when you need it. Problems with this switch can leave you stranded without lights, refrigeration, or other essential systems. Understanding common issues and troubleshooting steps will help you quickly diagnose and fix problems, keeping your adventures on track.
Common Battery Switch Problems and Their Causes
Several issues can arise with your battery switch. These often manifest as a complete lack of power, inconsistent charging of your batteries, or even unexpected power drain. Let’s examine the most frequent problems and their underlying causes. For example, a completely dead battery bank might indicate a problem with the switch itself, preventing proper charging from the shore power or alternator.
Inconsistent charging might suggest a faulty switch connection, leading to intermittent contact and preventing full charging cycles. A sudden power drain, even with the switch off, could indicate a short circuit within the switch or its wiring.
Troubleshooting Steps for Battery Switch Malfunctions
A systematic approach to troubleshooting is crucial. Start with the simplest checks and gradually move towards more complex diagnostics. This minimizes time and effort. First, visually inspect the switch for any obvious damage, loose connections, or corrosion. Then, check the fuses and circuit breakers in the system.
A blown fuse or tripped breaker could be the culprit, preventing power from reaching the batteries. Next, test the battery voltage directly using a multimeter. Low voltage indicates a charging problem that might or might not be related to the switch. If you suspect the switch itself is faulty, you may need to test its continuity with a multimeter, ensuring the circuits are properly connected when the switch is in the appropriate position.
If all else fails, consider replacing the switch.
Flowchart for Diagnosing Battery Switch Problems
A visual flowchart can guide you through the troubleshooting process. Imagine a flowchart with a central decision point: “Is there power to the system?”. If “No”, the next step is “Check fuses and circuit breakers”. If they are blown or tripped, replace/reset them and retest. If the problem persists, the path leads to “Inspect battery switch for damage and corrosion”.
If damage is found, replace the switch. If no damage is found, test the battery voltage. Low voltage suggests a charging issue, separate from the switch itself. If there is power to the system, but the batteries aren’t charging correctly, the flowchart branches to “Check the connections to the battery switch”. Loose or corroded connections should be cleaned and tightened.
If the problem continues, the path leads to “Test the switch continuity”. A faulty switch requires replacement. If the batteries are charging correctly, but power is still inconsistent, consider other components within the electrical system.
Battery Switch and Charging Systems Integration: Battery Switch On Travel Trailer Function
Your travel trailer’s battery switch is more than just an on/off switch; it’s a crucial component in managing power flow between your batteries and your RV’s charging sources. Understanding how it interacts with your charging system is key to maximizing battery life and avoiding potential problems.The battery switch acts as a gatekeeper, controlling which batteries receive power from your charging sources (alternator, solar panels, shore power converter) and which batteries supply power to your RV’s appliances.
When the switch is in the “both” or “combined” position, both battery banks are available for charging and discharging. In the “off” position, both banks are disconnected from the RV’s electrical system for safety. Switching to individual battery banks allows you to charge one bank while leaving the other available for use or to isolate a problematic battery.
Charging System Configurations and Their Effects on Battery Life
Different RV charging systems offer varying degrees of efficiency and impact on battery longevity. A basic system might only charge batteries from the alternator through a voltage regulator. More sophisticated systems incorporate solar panels, which can provide supplemental charging, especially when boon-docking. The inclusion of a battery management system (BMS) further enhances battery life by optimizing charging rates and preventing overcharging or deep discharging.
A three-stage charging system (bulk, absorption, float) is generally preferred for maximizing battery lifespan. A system that only utilizes the alternator for charging will put more strain on the batteries, potentially shortening their lifespan compared to a system with multiple charging sources. The use of a BMS allows for more precise control of charging, preventing damage and extending battery life.
Factors Influencing RV Battery Lifespan
Several factors significantly affect how long your RV batteries will last. Understanding these factors can help you make informed decisions to prolong their lifespan.
Okay, so you’re dealing with your travel trailer’s battery, right? Knowing how to use that battery switch is key. Check out this helpful guide on the battery switch on travel trailer function to understand its purpose. It’s super important to avoid draining your house battery while parked. Another great resource explaining the battery switch on travel trailer function is available here; it breaks down the process simply and clearly.
Understanding this switch will save you headaches and ensure your next adventure goes smoothly!
- Charging Method: As mentioned, a multi-stage charging system is ideal. Overcharging or undercharging significantly reduces battery life.
- Depth of Discharge (DoD): Frequently discharging batteries to a very low state (deep discharging) reduces their lifespan. Aim to keep DoD below 50% for optimal longevity.
- Battery Type and Age: Different battery types (flooded lead-acid, AGM, lithium) have varying lifespans. Even within a type, age is a critical factor; older batteries degrade faster.
- Ambient Temperature: Extreme temperatures (both hot and cold) negatively impact battery performance and lifespan. Storing batteries in a cool, dry place helps.
- Maintenance: Regular inspection and maintenance, such as checking electrolyte levels (for flooded lead-acid batteries) and cleaning terminals, can extend battery life. Following manufacturer recommendations for maintenance is essential.
- Load Management: Excessive use of high-drain appliances can quickly deplete batteries, reducing their lifespan. Efficient power management is crucial.
Battery Switch Maintenance and Replacement
Keeping your RV’s battery switch and batteries in top condition is crucial for reliable power. Regular maintenance prevents unexpected breakdowns and extends the lifespan of your valuable components, saving you money and frustration in the long run. This section details a recommended maintenance schedule and procedures for replacement and cleaning.
Routine Maintenance Schedule for RV Battery Switches and Batteries
A proactive approach to maintenance is key. This involves regular visual inspections and occasional more thorough checks. Ignoring small issues can lead to larger, more costly problems down the line.
- Monthly Inspection: Visually inspect the battery switch for any signs of corrosion, loose connections, or damage. Check the battery terminals for corrosion and tightness. Lightly clean any visible corrosion with a wire brush and baking soda solution.
- Every Six Months: Perform a more thorough inspection. Check the battery switch’s operation, ensuring it smoothly switches between positions. Test the battery voltage using a multimeter to assess the state of charge. Look for any signs of leaking or bulging batteries.
- Annual Service: This involves a complete cleaning of the battery terminals and connections (detailed below). Consider having your batteries professionally tested for capacity and internal resistance if you notice any performance issues.
Best Practices for Extending the Life of RV Batteries
Proper care significantly extends battery life. These practices ensure optimal performance and longevity.
- Keep Batteries Clean: Regularly clean battery terminals and connections to prevent corrosion, which reduces conductivity and battery life. Use a wire brush and baking soda solution (a paste of baking soda and water).
- Maintain Proper Charge: Avoid letting your batteries completely discharge. Use a battery tender or trickle charger to maintain a full charge, especially during periods of non-use. Regularly check the state of charge using a multimeter.
- Protect from Extreme Temperatures: Extreme heat or cold significantly reduces battery lifespan. Consider using battery insulation or storing batteries in a climate-controlled area when possible.
- Equalize Flooded Lead-Acid Batteries: For flooded lead-acid batteries, periodically perform an equalization charge to ensure all cells are at the same voltage. This process should only be done according to the manufacturer’s instructions and with appropriate safety precautions.
Replacing a Faulty Battery Switch
Replacing a battery switch is a relatively straightforward process, but always disconnect the negative battery terminal first for safety.
- Disconnect Batteries: Disconnect the negative (-) battery terminal first, then the positive (+) terminal. This prevents accidental short circuits.
- Remove Old Switch: Remove the old battery switch, noting the wiring configuration before disconnecting any wires. Take photos if necessary.
- Install New Switch: Install the new battery switch, ensuring it is securely mounted. Connect the wires according to the wiring diagram or your notes from the old switch.
- Reconnect Batteries: Reconnect the positive (+) terminal first, then the negative (-) terminal.
- Test Operation: Test the operation of the new battery switch to ensure it functions correctly.
Cleaning Battery Terminals and Connections
Clean terminals prevent corrosion and ensure efficient power transfer.
- Disconnect Batteries: Disconnect the negative (-) battery terminal first, then the positive (+) terminal.
- Prepare Cleaning Solution: Mix baking soda and water to form a paste. Alternatively, use a commercial battery terminal cleaner.
- Clean Terminals: Use a wire brush to scrub the terminals and connections, removing any corrosion. Apply the baking soda paste or cleaner and scrub again.
- Rinse and Dry: Rinse the terminals and connections with clean water and allow them to dry completely.
- Apply Protective Coating (Optional): Apply a protective coating, such as dielectric grease, to the terminals and connections to prevent future corrosion.
- Reconnect Batteries: Reconnect the positive (+) terminal first, then the negative (-) terminal.
Mastering your travel trailer’s battery switch is essential for reliable power on the road. By understanding the different types of switches, safe operation procedures, and common troubleshooting steps, you’ll be prepared to handle any power situation with confidence. Regular maintenance and proactive care will ensure your battery system stays healthy and provides years of reliable service, keeping your adventures powered up!
FAQ Corner
How often should I check my battery switch?
Before each trip and at least every three months, visually inspect for corrosion and ensure the switch operates smoothly.
What causes a battery switch to fail?
Corrosion, loose connections, internal component failure, and overuse are common causes. Regular cleaning and maintenance can prevent many issues.
Can I use a battery switch with different battery types?
Generally, yes, but ensure the switch is rated for the voltage and amperage of your batteries. Mixing battery chemistries (e.g., lead-acid and lithium) requires specific considerations.
My battery switch is sparking; what should I do?
Immediately disconnect the batteries. Do not attempt to use the switch until you’ve identified and fixed the cause (usually loose or corroded connections). Seek professional help if needed.
